Acroquad
Introduction
Our Goal: To assemble a UAV with an onboard computer that responds to visual commands by actuating in a corresponding movement.
Unmanned aerial vehicles are currently a popular branch of robotics, with leading researchers integrating computer vision and machine learning to reduce human error in controlling drones. Because both fields are relatively new, current researchers are still developing better and more sophisticated ways to control quadcopters with machine learning! Our group was interested in combining racing drones and computer vision to create a quadcopter that responds to camera inputs. The project was challenging, as we had to not only construct a quadcopter with an onboard computer, but also run an intensive computer vision algorithm on the quadcopter and figure out how to control the drone with the outputs from the algorithm. The applications of such a product are limitless, including autonomous disaster search and rescue, subject tracking in cinematography, and automatic obstacle avoidance for UAVs.
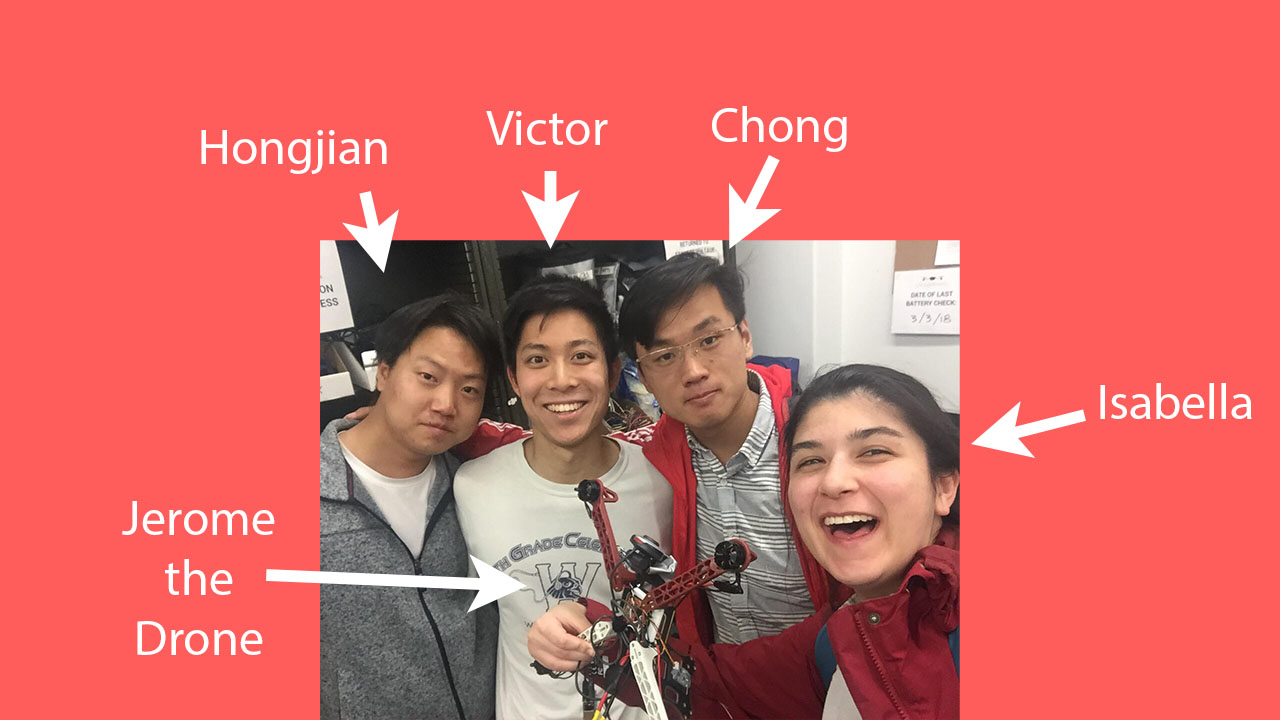
Team
| Name | Contact | Bio | Contribution |
| Chong Zhao |
E-mail: chongzhao97@gmail.com
Tel: (+86)13520895272 Wechat: Zhao-Chong1997 QQ: 1447596952 Skype: live:1447596952 |
I am an exchange student in EE department from China mainland and my major in home university is Physics. I am familiar with mechanics and mathematics skills such as random processes etc. | I worked with Hongjian on the computer vision tracking algorithm in Open CV. I have tried many vision programs including edge detecting, convolution algorithms etc. Besides that, I improved the robust of the final algorithms. I also helped debug issues that occurred when transferring the program to the raspberry pi and helped Hongjian Duan to deal with the system and communication problem. Thank you! |
| Hongjian Duan |
Email: duanhongjian15@mails.ucas.ac.cn
Email: herbertduan@berkeley.edu LinkedIn: https://www.linkedin.com/in/hongjian-duan/ Github: https://github.com/HerbertDuan15 |
I am a 4th year exchange EE student, and major in CS in my home school. I have learned all the main courses in CS and have a lot experience in database and operating system and Computer Architecture and has learned the intro to AI. This project gave me a better understanding of the hardware and the control system (Another course EE221A Linear system theory in this semester). | I worked with Chong Zhao on the computer vision algorithm to track the tennis ball and Identify its direction of motion. We successfully designed a program to perform tracking and identification on the Pi on which the computational resources are very limited. I also debugged communication issues between the drone and the raspberry pi and helped set parameters in rosflight for successful communication. |
| Isabella Maceda |
Email: imaceda@berkeley.edu
LinkedIn: https://www.linkedin.com/in/isabella-maceda-b07264124/ |
I am a undergraduate Electrical Engineering and Computer Science major at UC Berkeley. I have a background working with drones and I am co-president of UAVs@Berkeley, an on-campus drone student organization. I was inspired to do the AcroQuad project by a friend and member of UAVs@Berkeley. This project was the perfect opportunity for me to combine two passions of mine, drones and machine learning/computer vision. Aside from drones, my hobbies include baking and learning new languages. | For this project, I was the leader for all hardware aspects. I assembled the drone and debugged all hardware malfunctions. I also was in charge of testing out the hardware components and uploading different firmwares on the flight controller. I also played a role in setting up the parameters in the rosflight program so the software could communicate with the hardware. Lastly, I helped to integrate the computer vision aspect with the physical drone, along with my other team members. |
| Victor Chan |
Email: victorchan@berkeley.edu
LinkedIn: https://linkedin.com/in/victorchan314 Github: https://github.com/victorchan314 |
Hi! I am an EECS undergraduate student at UC Berkeley. I have a background in machine learning and robotics, so for me, Acroquad was the perfect combination of esoteric hardware debugging and annoying coding problems. In my spare time I teach the Parkour Decal at Berkeley (check us out) and boulder at Bridges! | I tackled everything related to the Raspberry Pi and ROS. This includes setting up Ubuntu with ROS on the Pi, writing the ROS node to translate between the computer vision outputs and ROSflight commands, building the package structure, and configuring our launch process. I also got the camera feed running and configured headless setup of the Pi. Finally, I created and styled the website for the report. |
Design
For our design criteria, we decided that our project must have a working, flying quadcopter. It should process visual input from a camera and use that input to control the quadcopter. Because drones are notorious for being inconsistent, we do not have any lower limit for reliability, except that it should work at least some of the time; however, the separate components should function properly.
Our final design pits a Raspberry Pi equipped with Ubuntu 16.04 and the ROS Kinetic as the onboard computer. It is connected to the flight controller of the drone and uses ROSflight to communicate with the drone, a small generic FPV racing quadcopter. The software is all written in Python, which in our opinion, is the most suitable language for both ROS and for computer vision. It integrates the OpenCV computer vision function and the ROSflight firmware with a ROS node as the link between them. As a result, the sensing and actuation scripts are handled together in the ROS node. In our finalized version, our computer vision script tracks a bright yellow circle (e.g. a tennis ball) and sends movement commands to the motors based on the direction the ball is moved.
Using the Raspberry Pi was a trade-off between expensive computing power and simple adaptability. We weren’t sure exactly how the code would be run, and with our budget of $50, we decided that the Raspberry Pi, while not optimal, was good enough to meet our design criteria. In a real-world situation, the expensive Nvidia Jetson would be more likely to meet any reliability criteria. Another related trade-off was between running the computer vision on the onboard or offboard computer. The offboard computer was arguably faster and better-equipped to handle the code, but getting the video feed to the camera over the network would be far too slow. Because the Raspberry Pi was enough to handle the terrible resolution of the Logitech webcams, we were able to bypass the offboard computer. We were limited to tracking “easier” objects, such as a bright yellow circle instead of human body parts. Again, in an industry setting, a more powerful onboard computer would be a great starting solution to allowing more computer power.
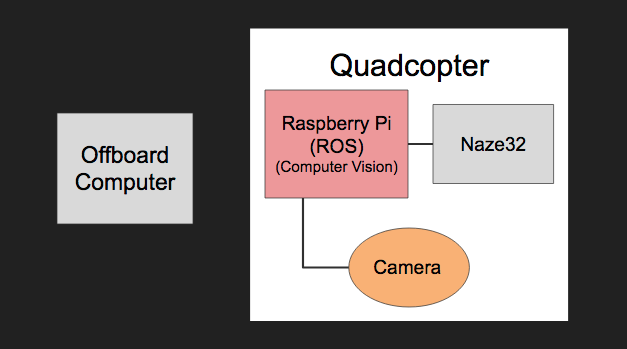
Hardware
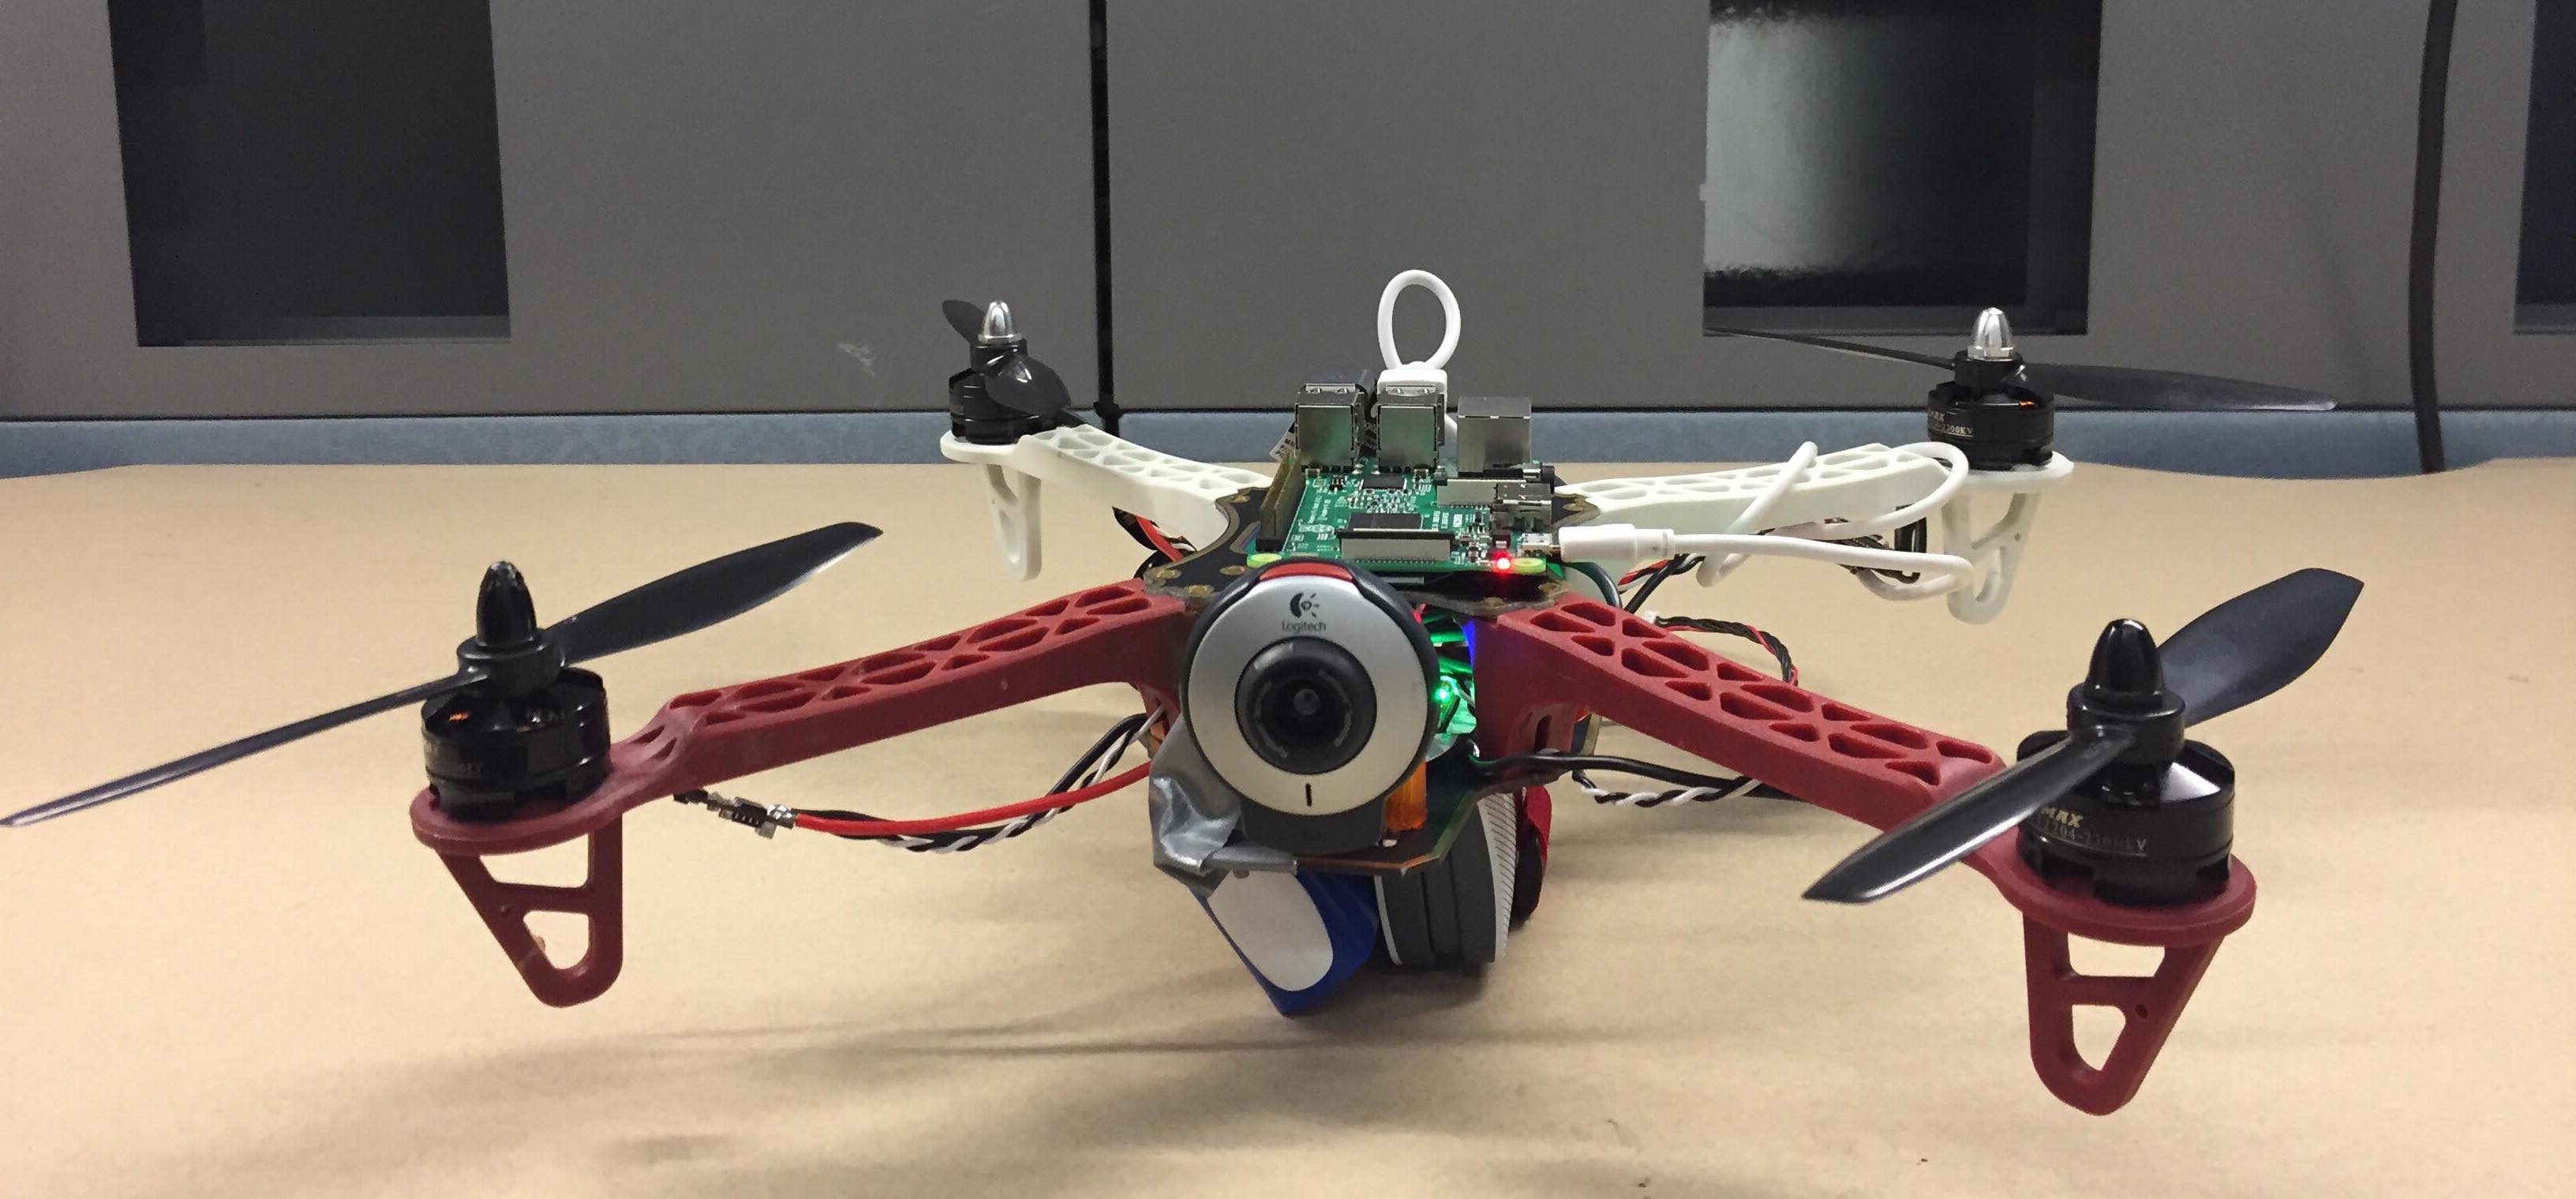
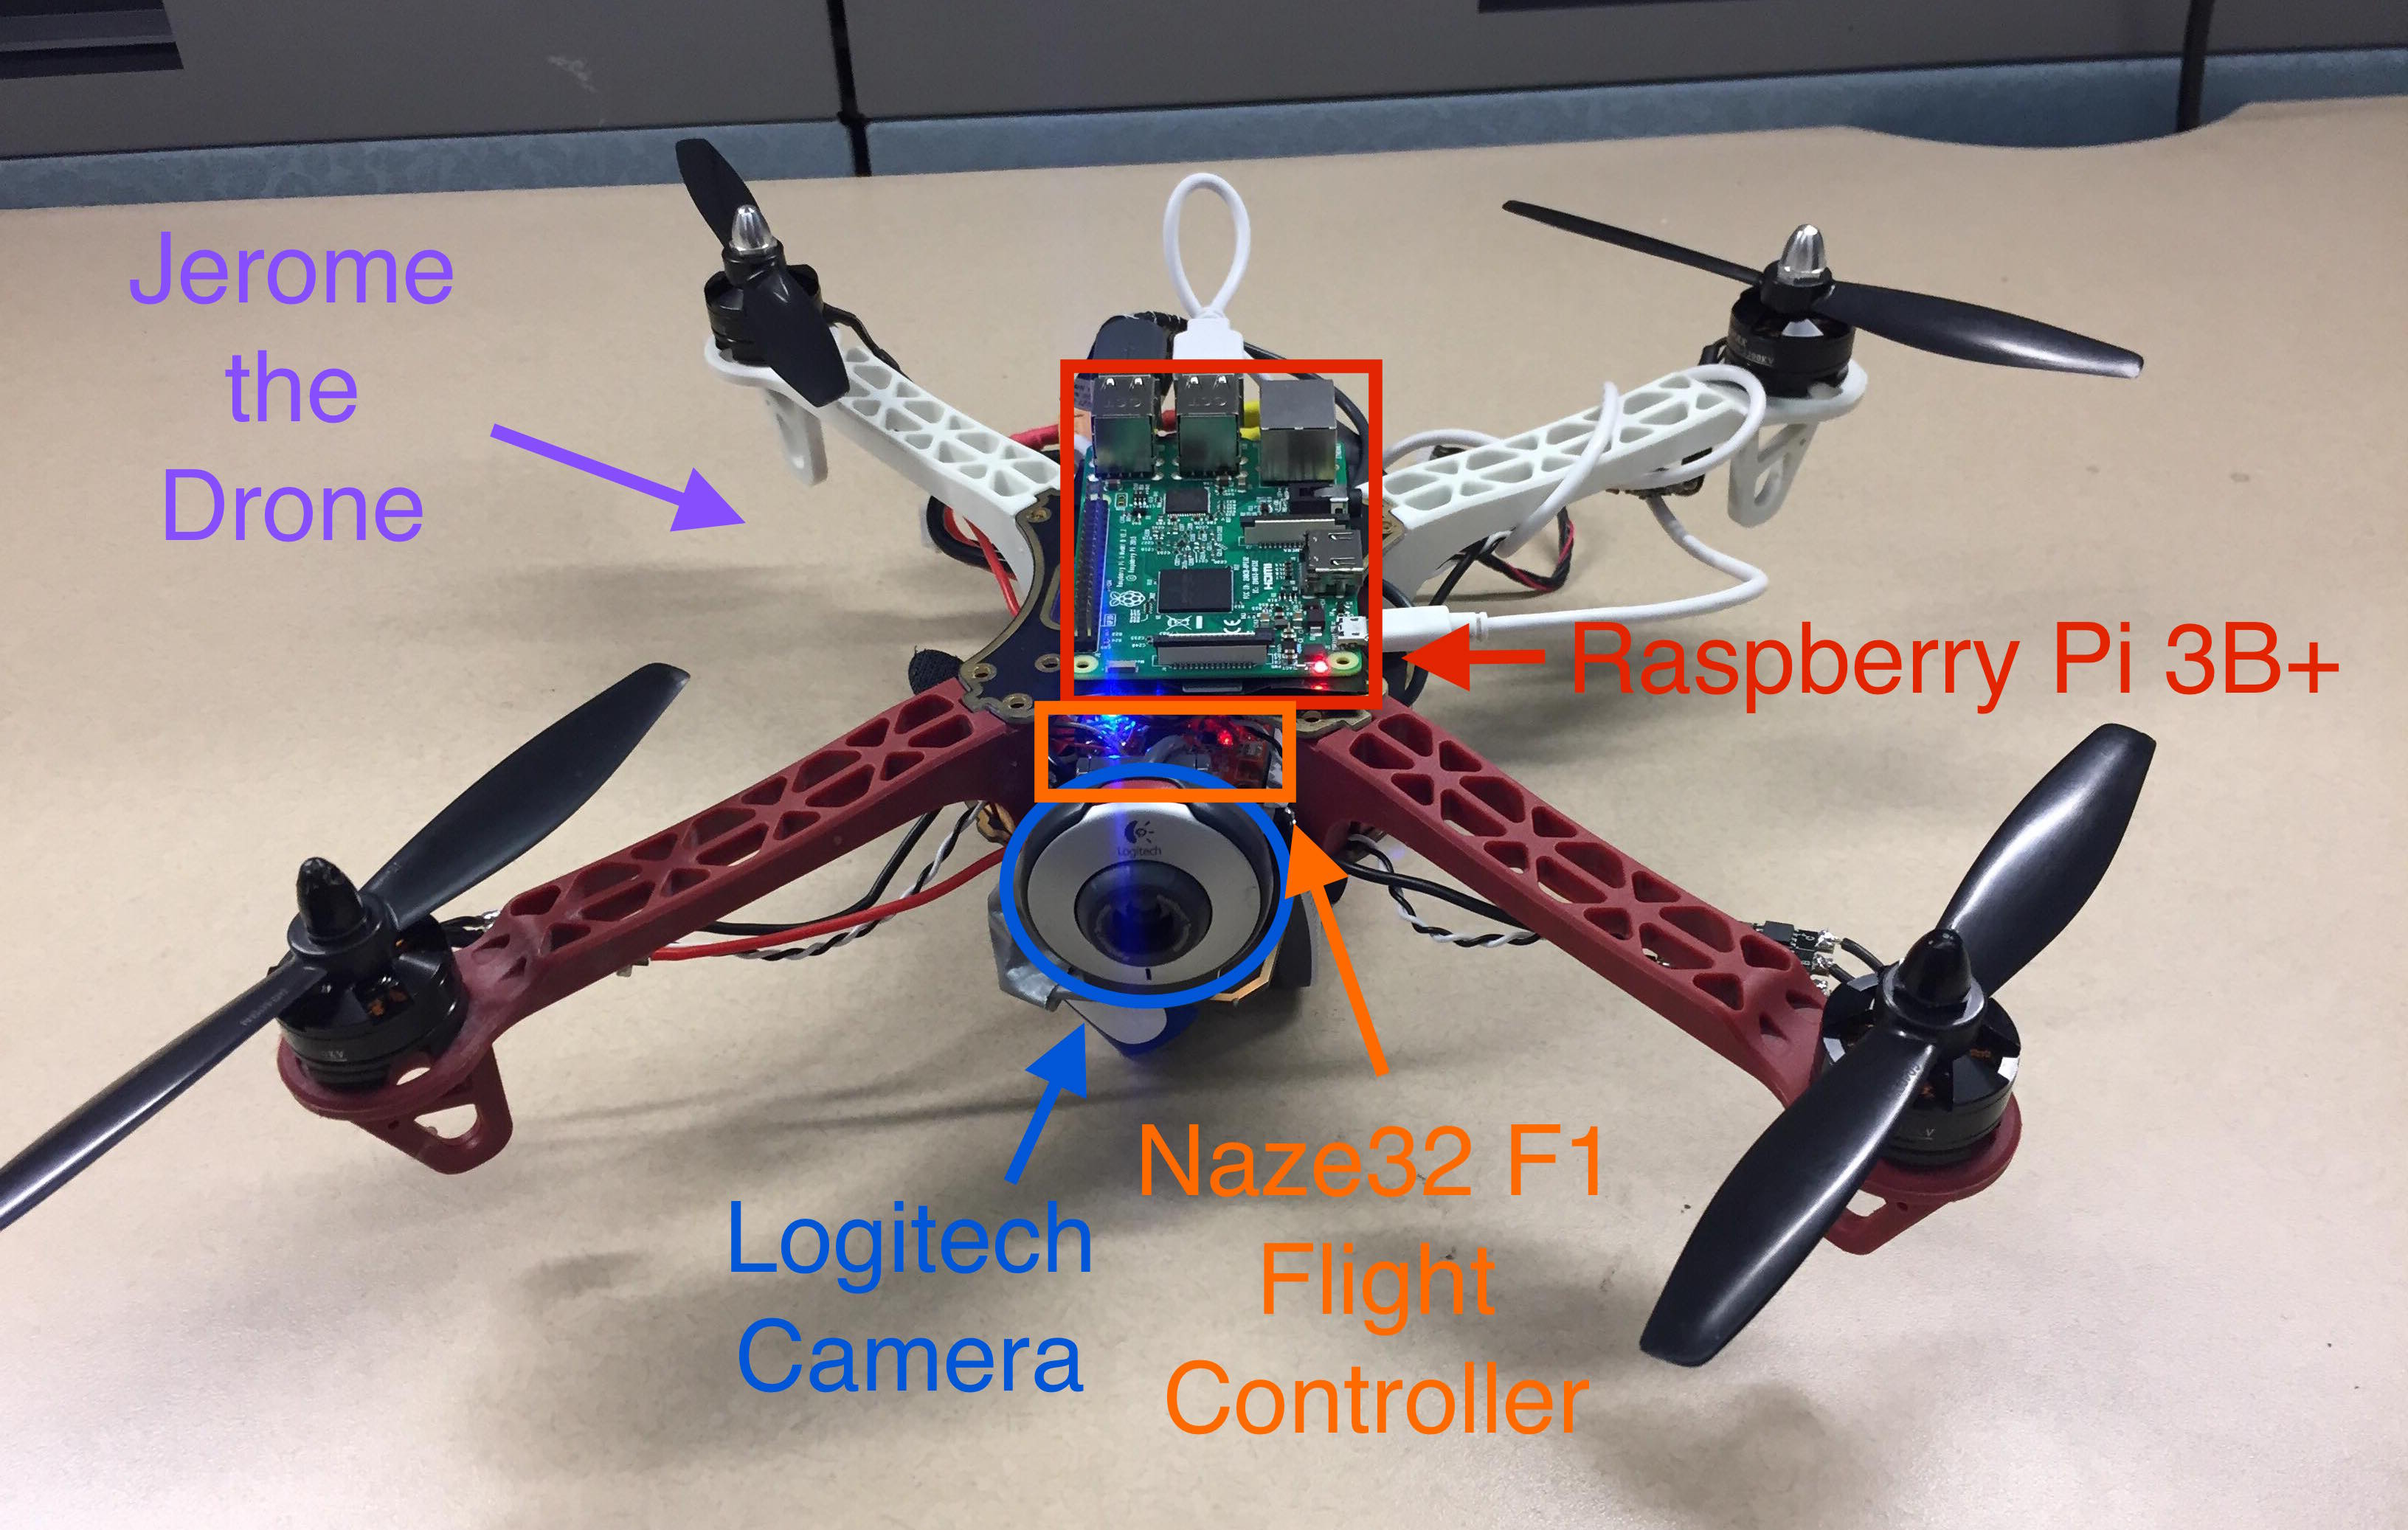
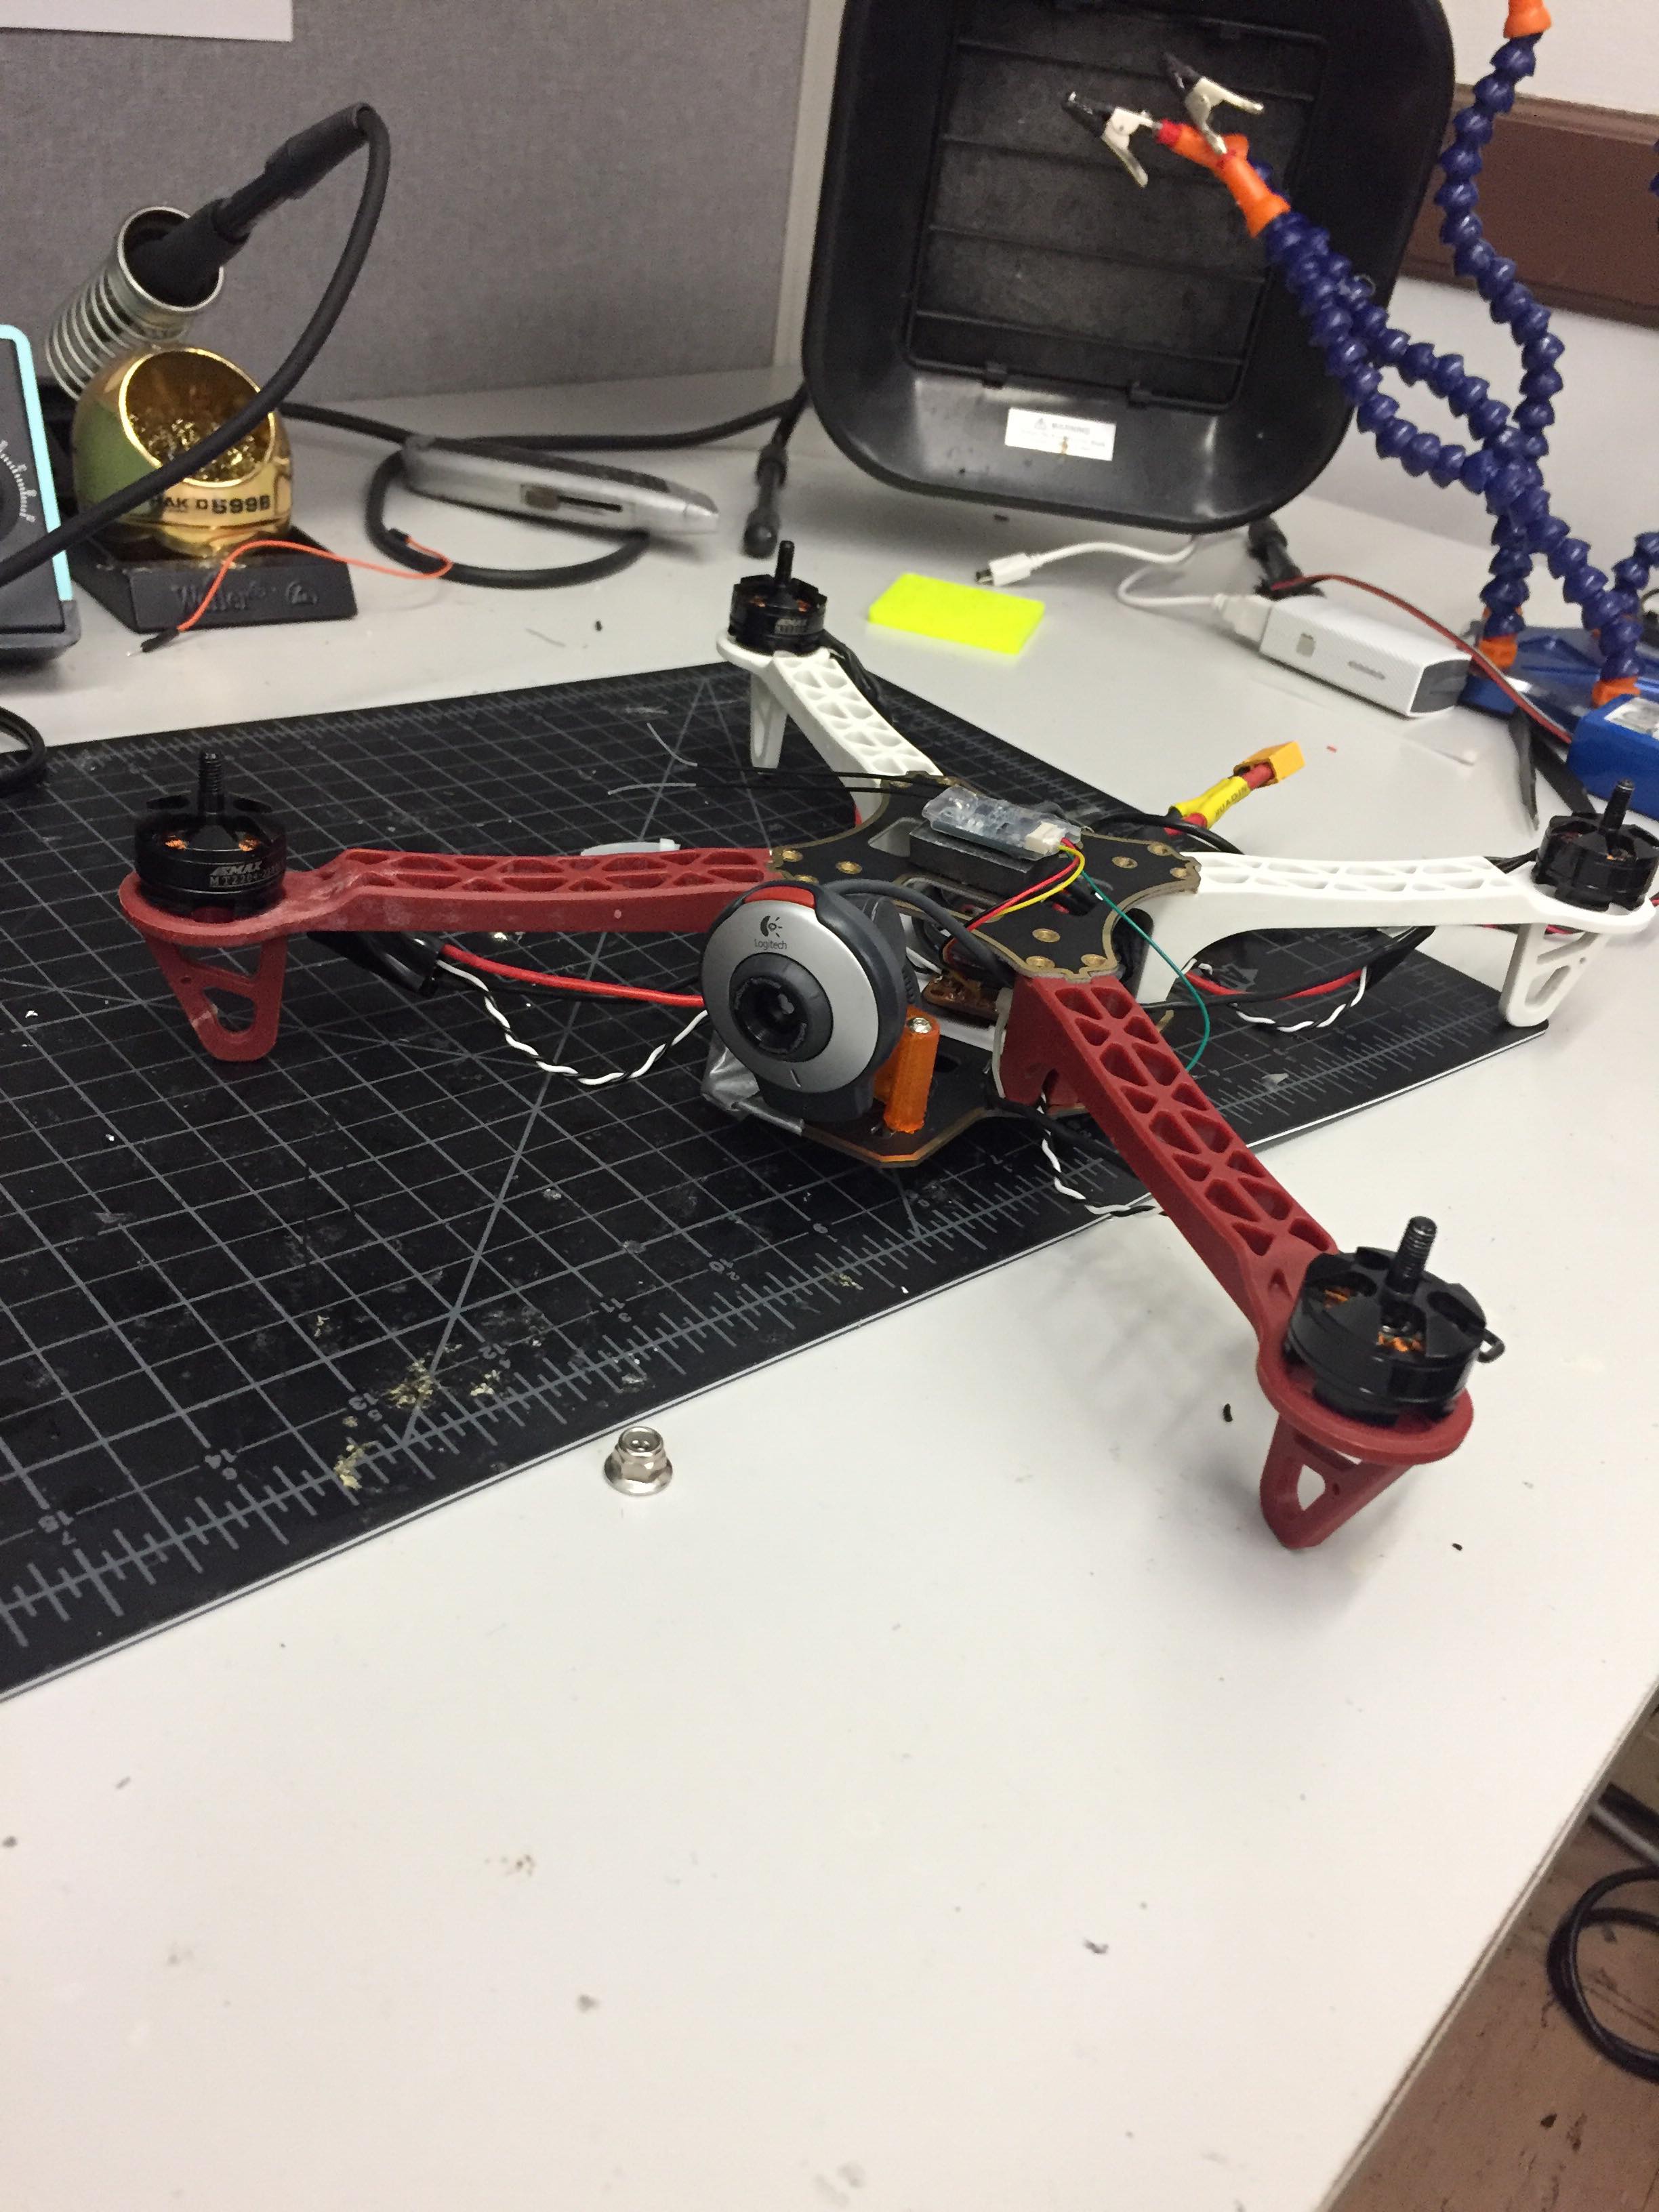
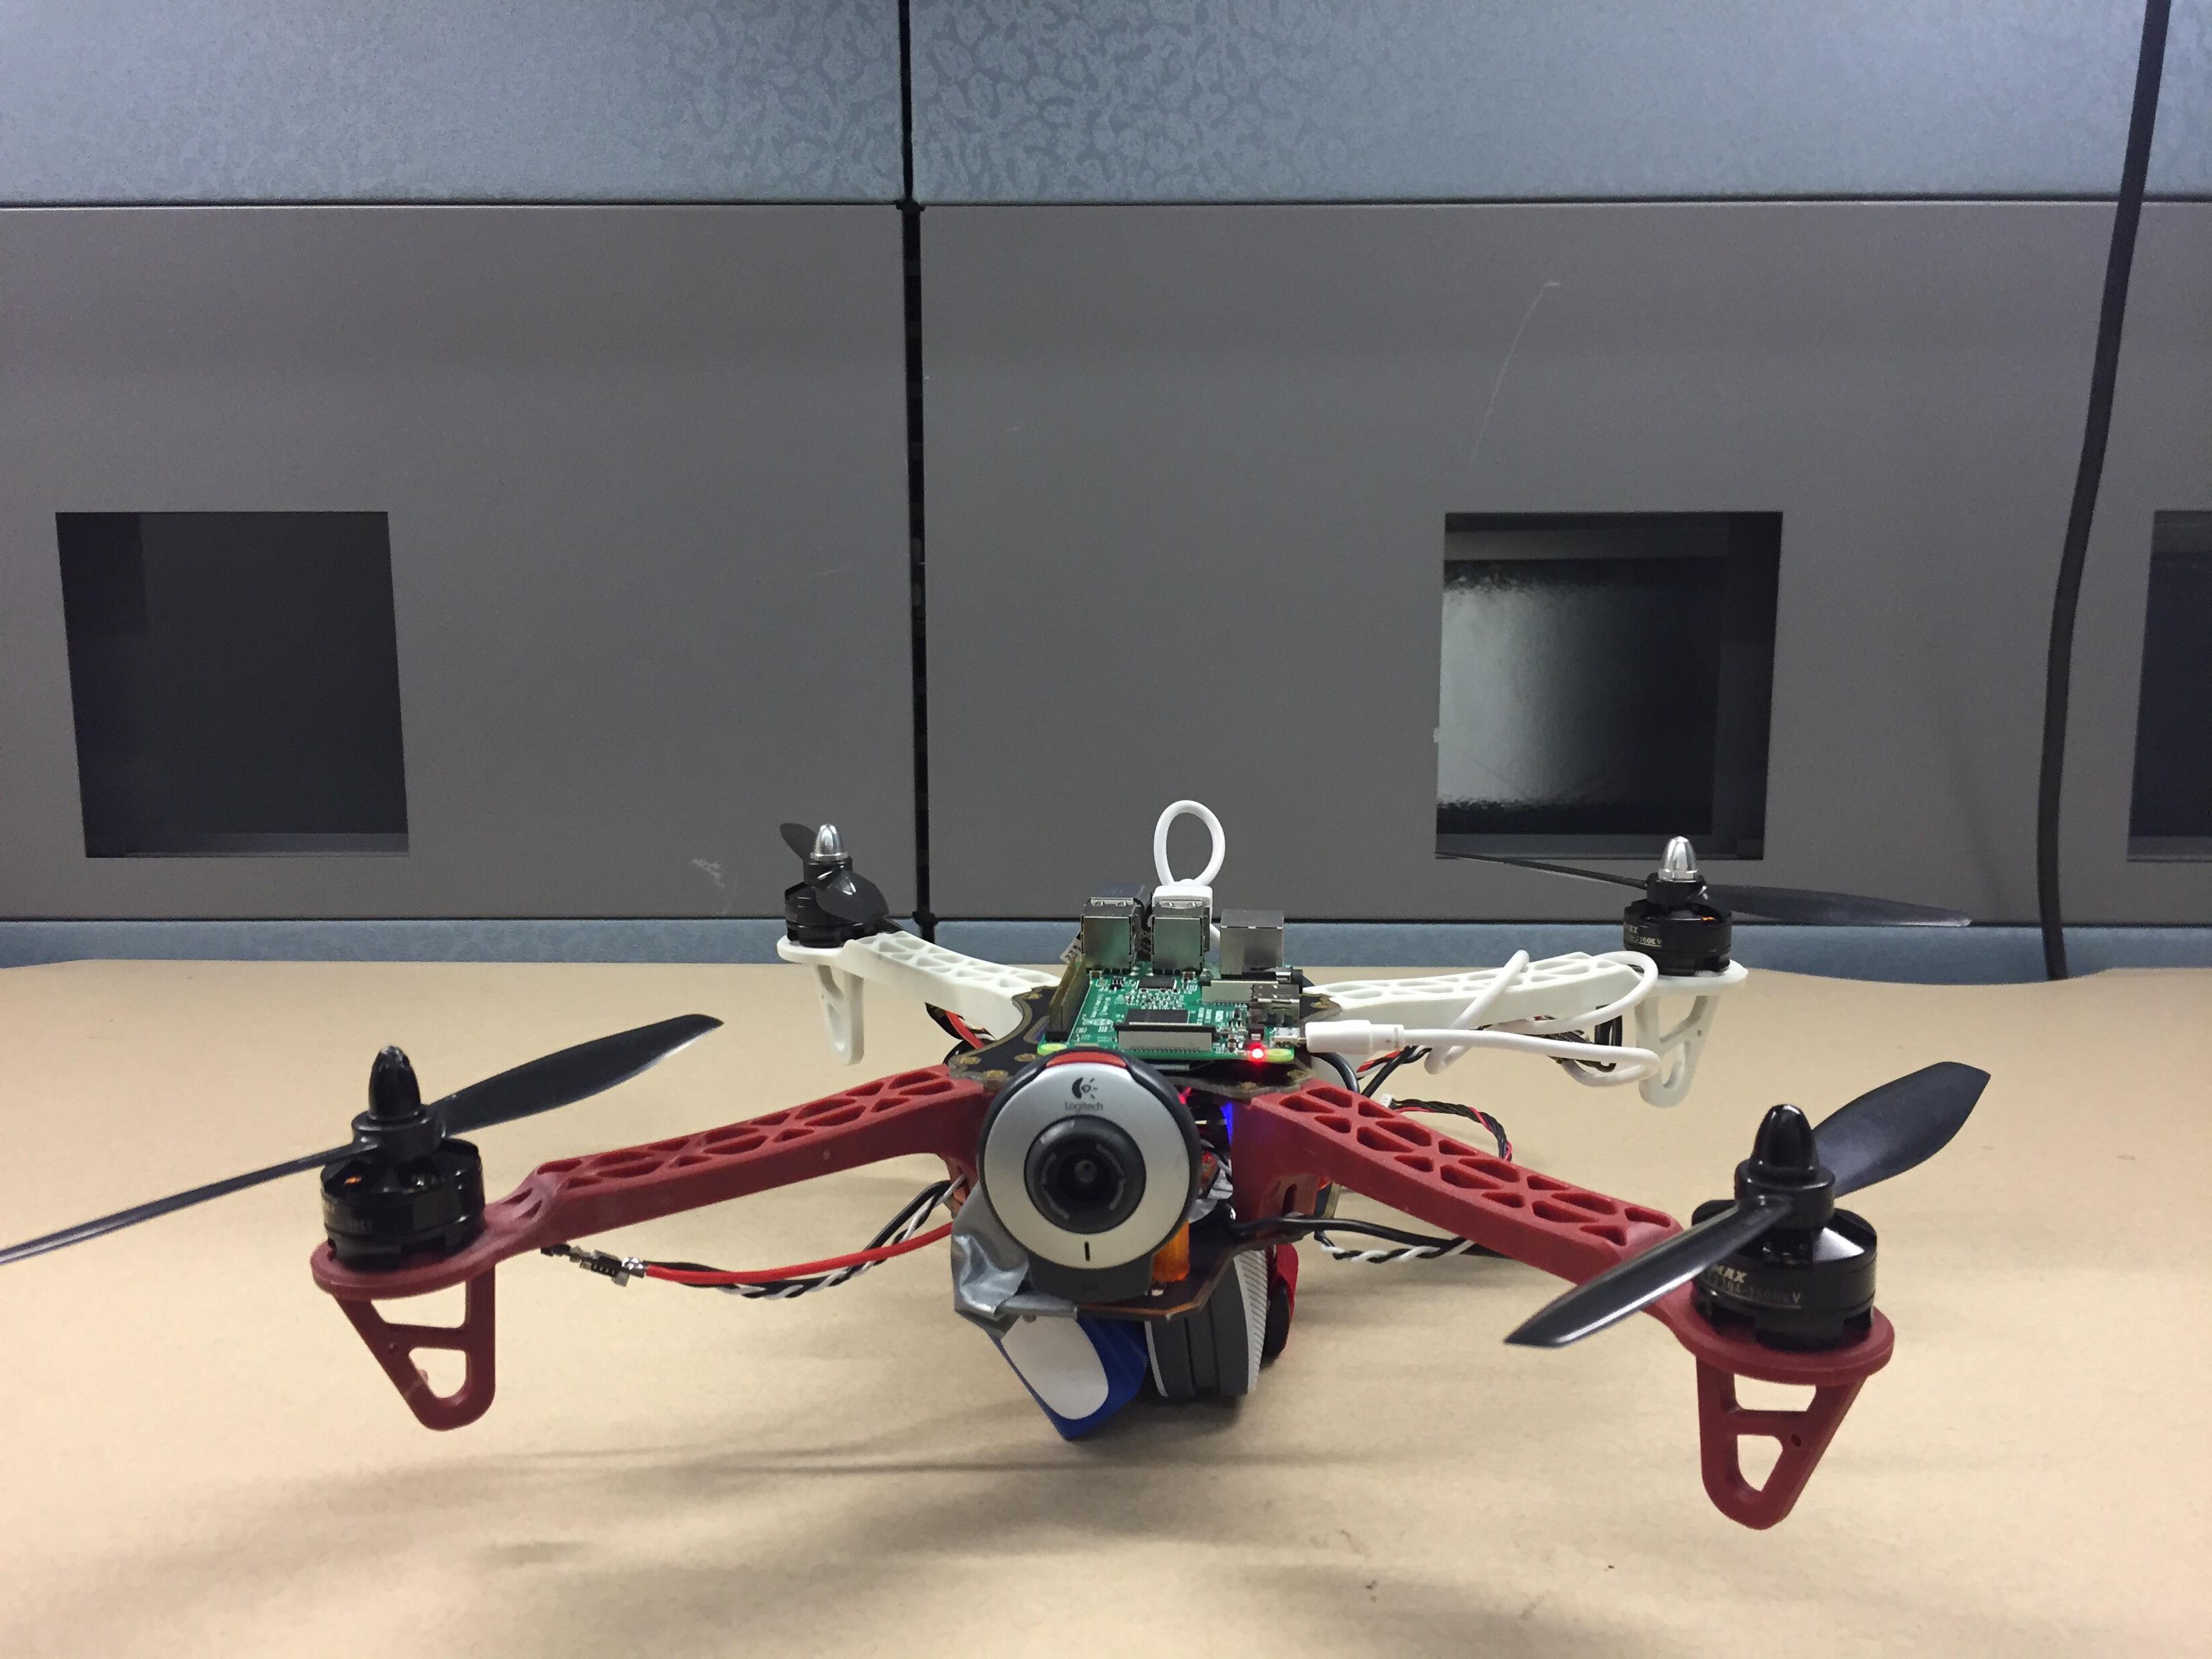
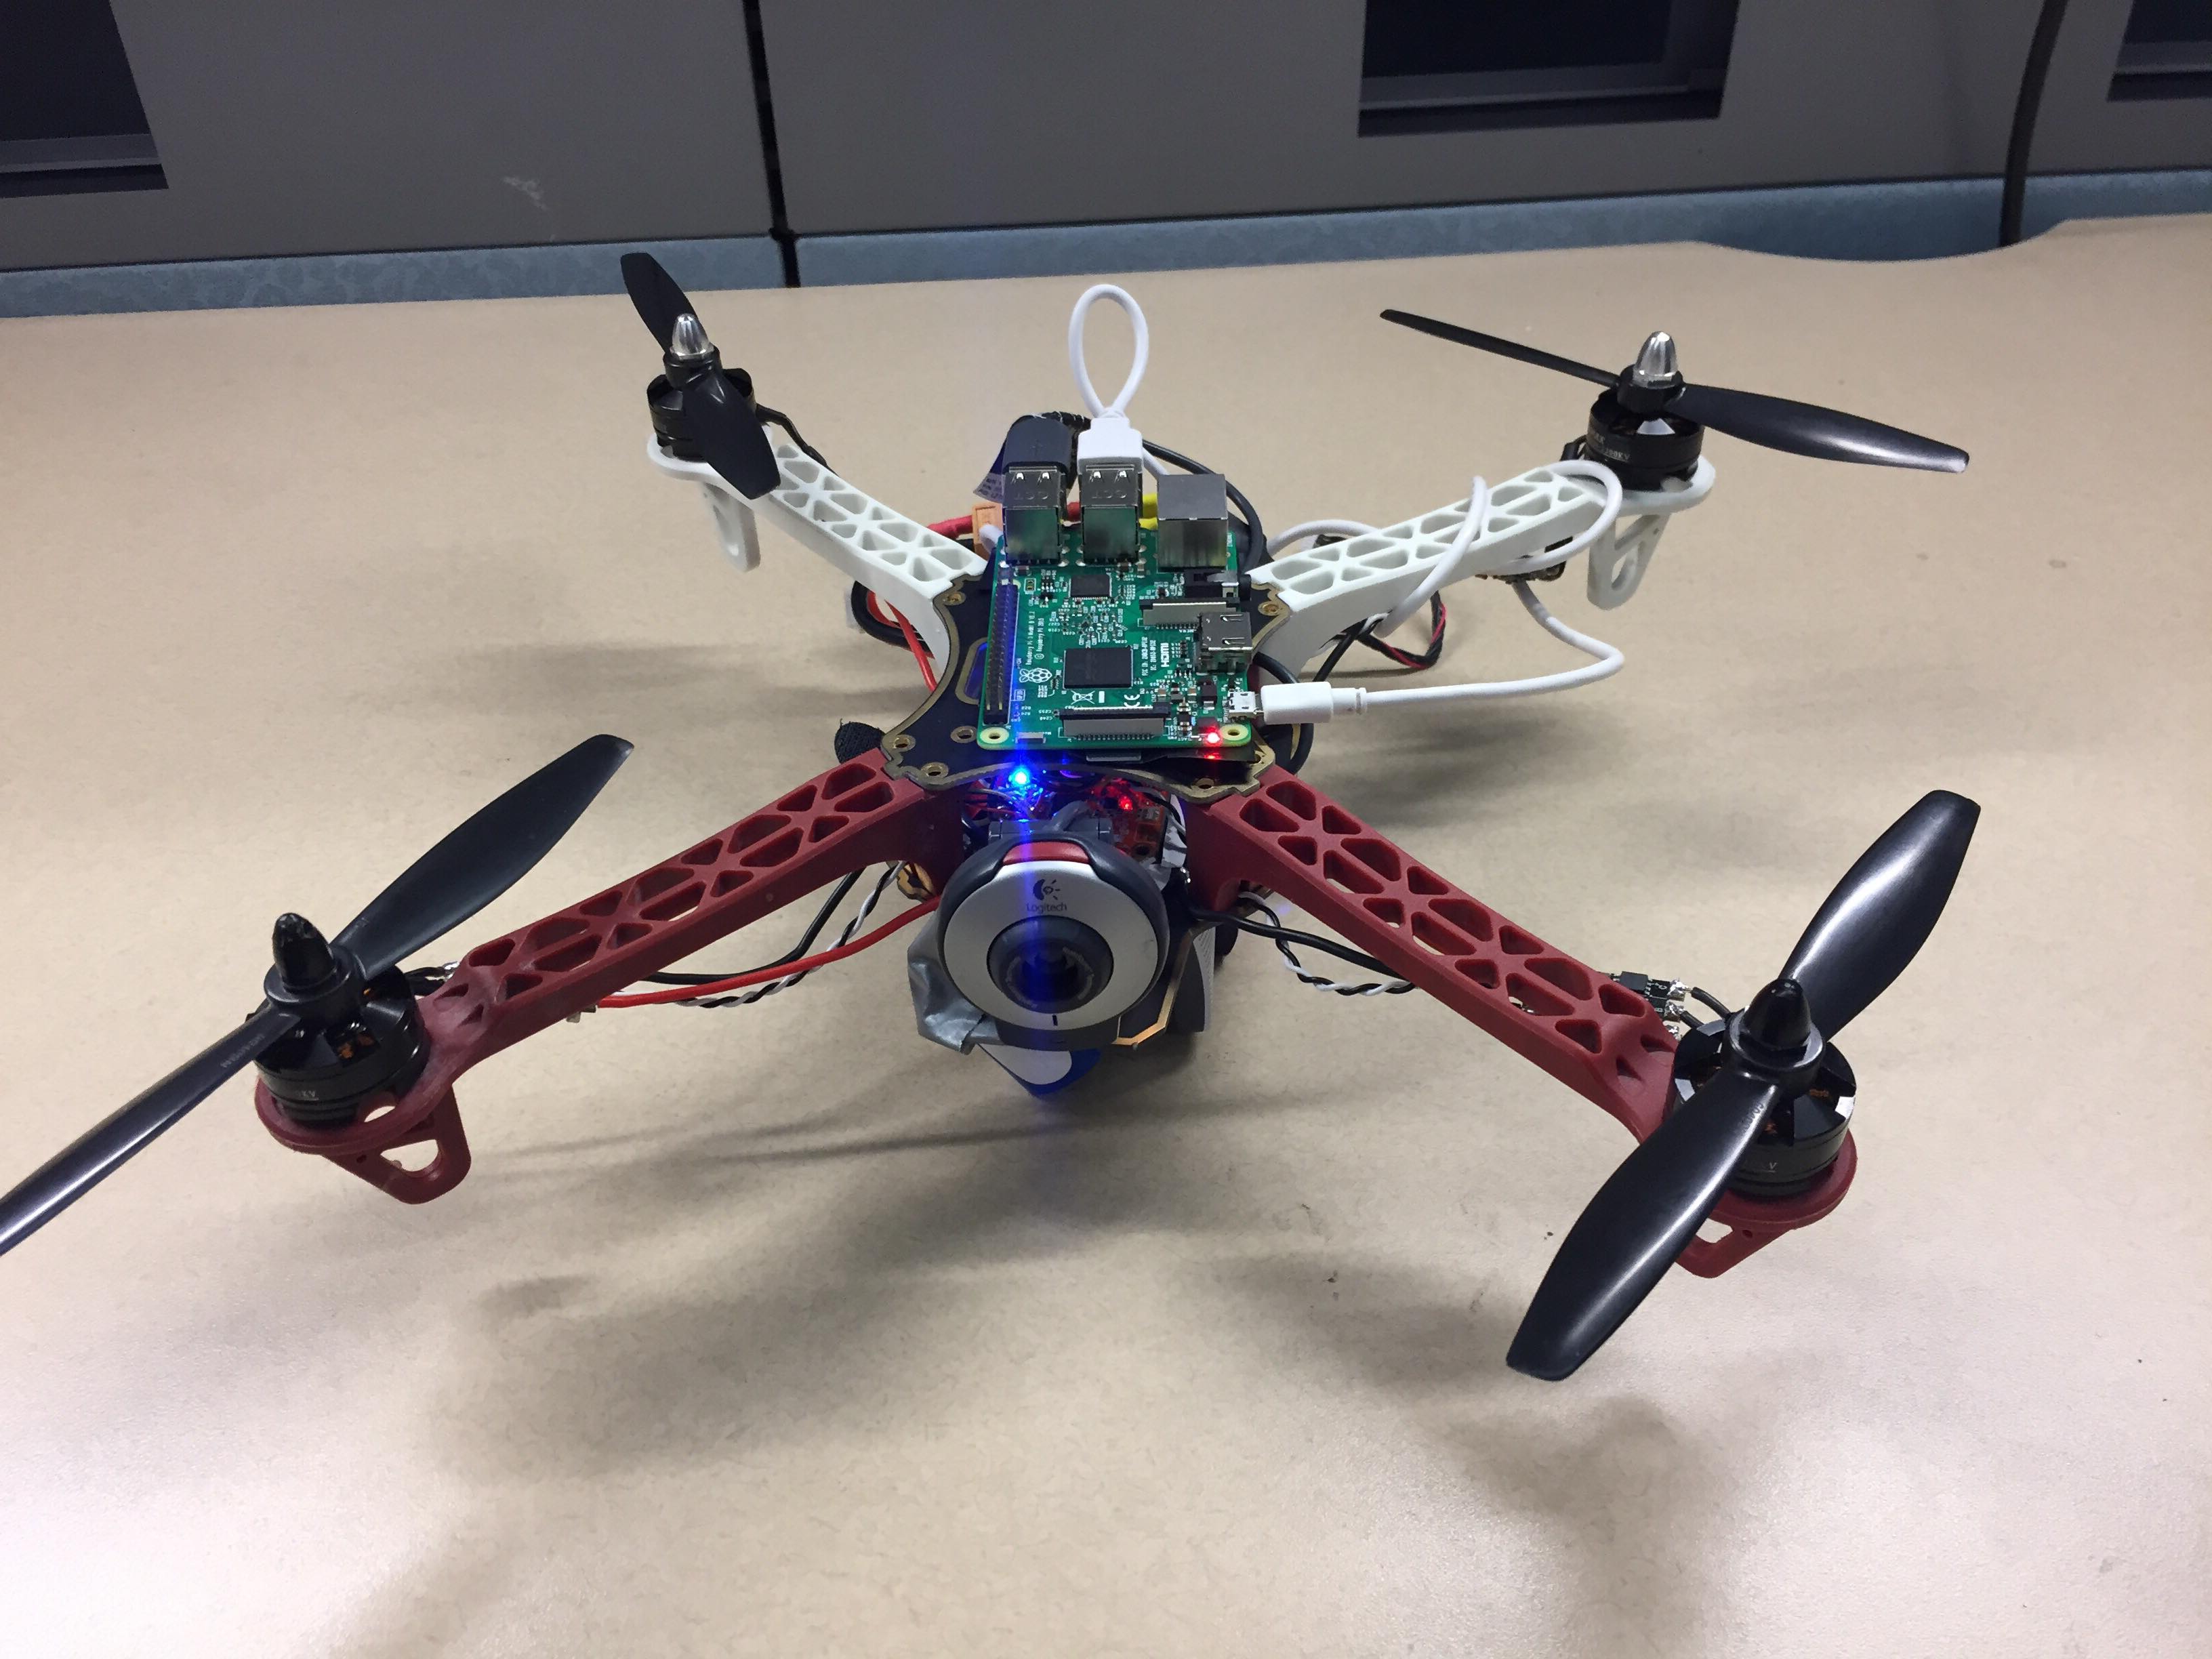
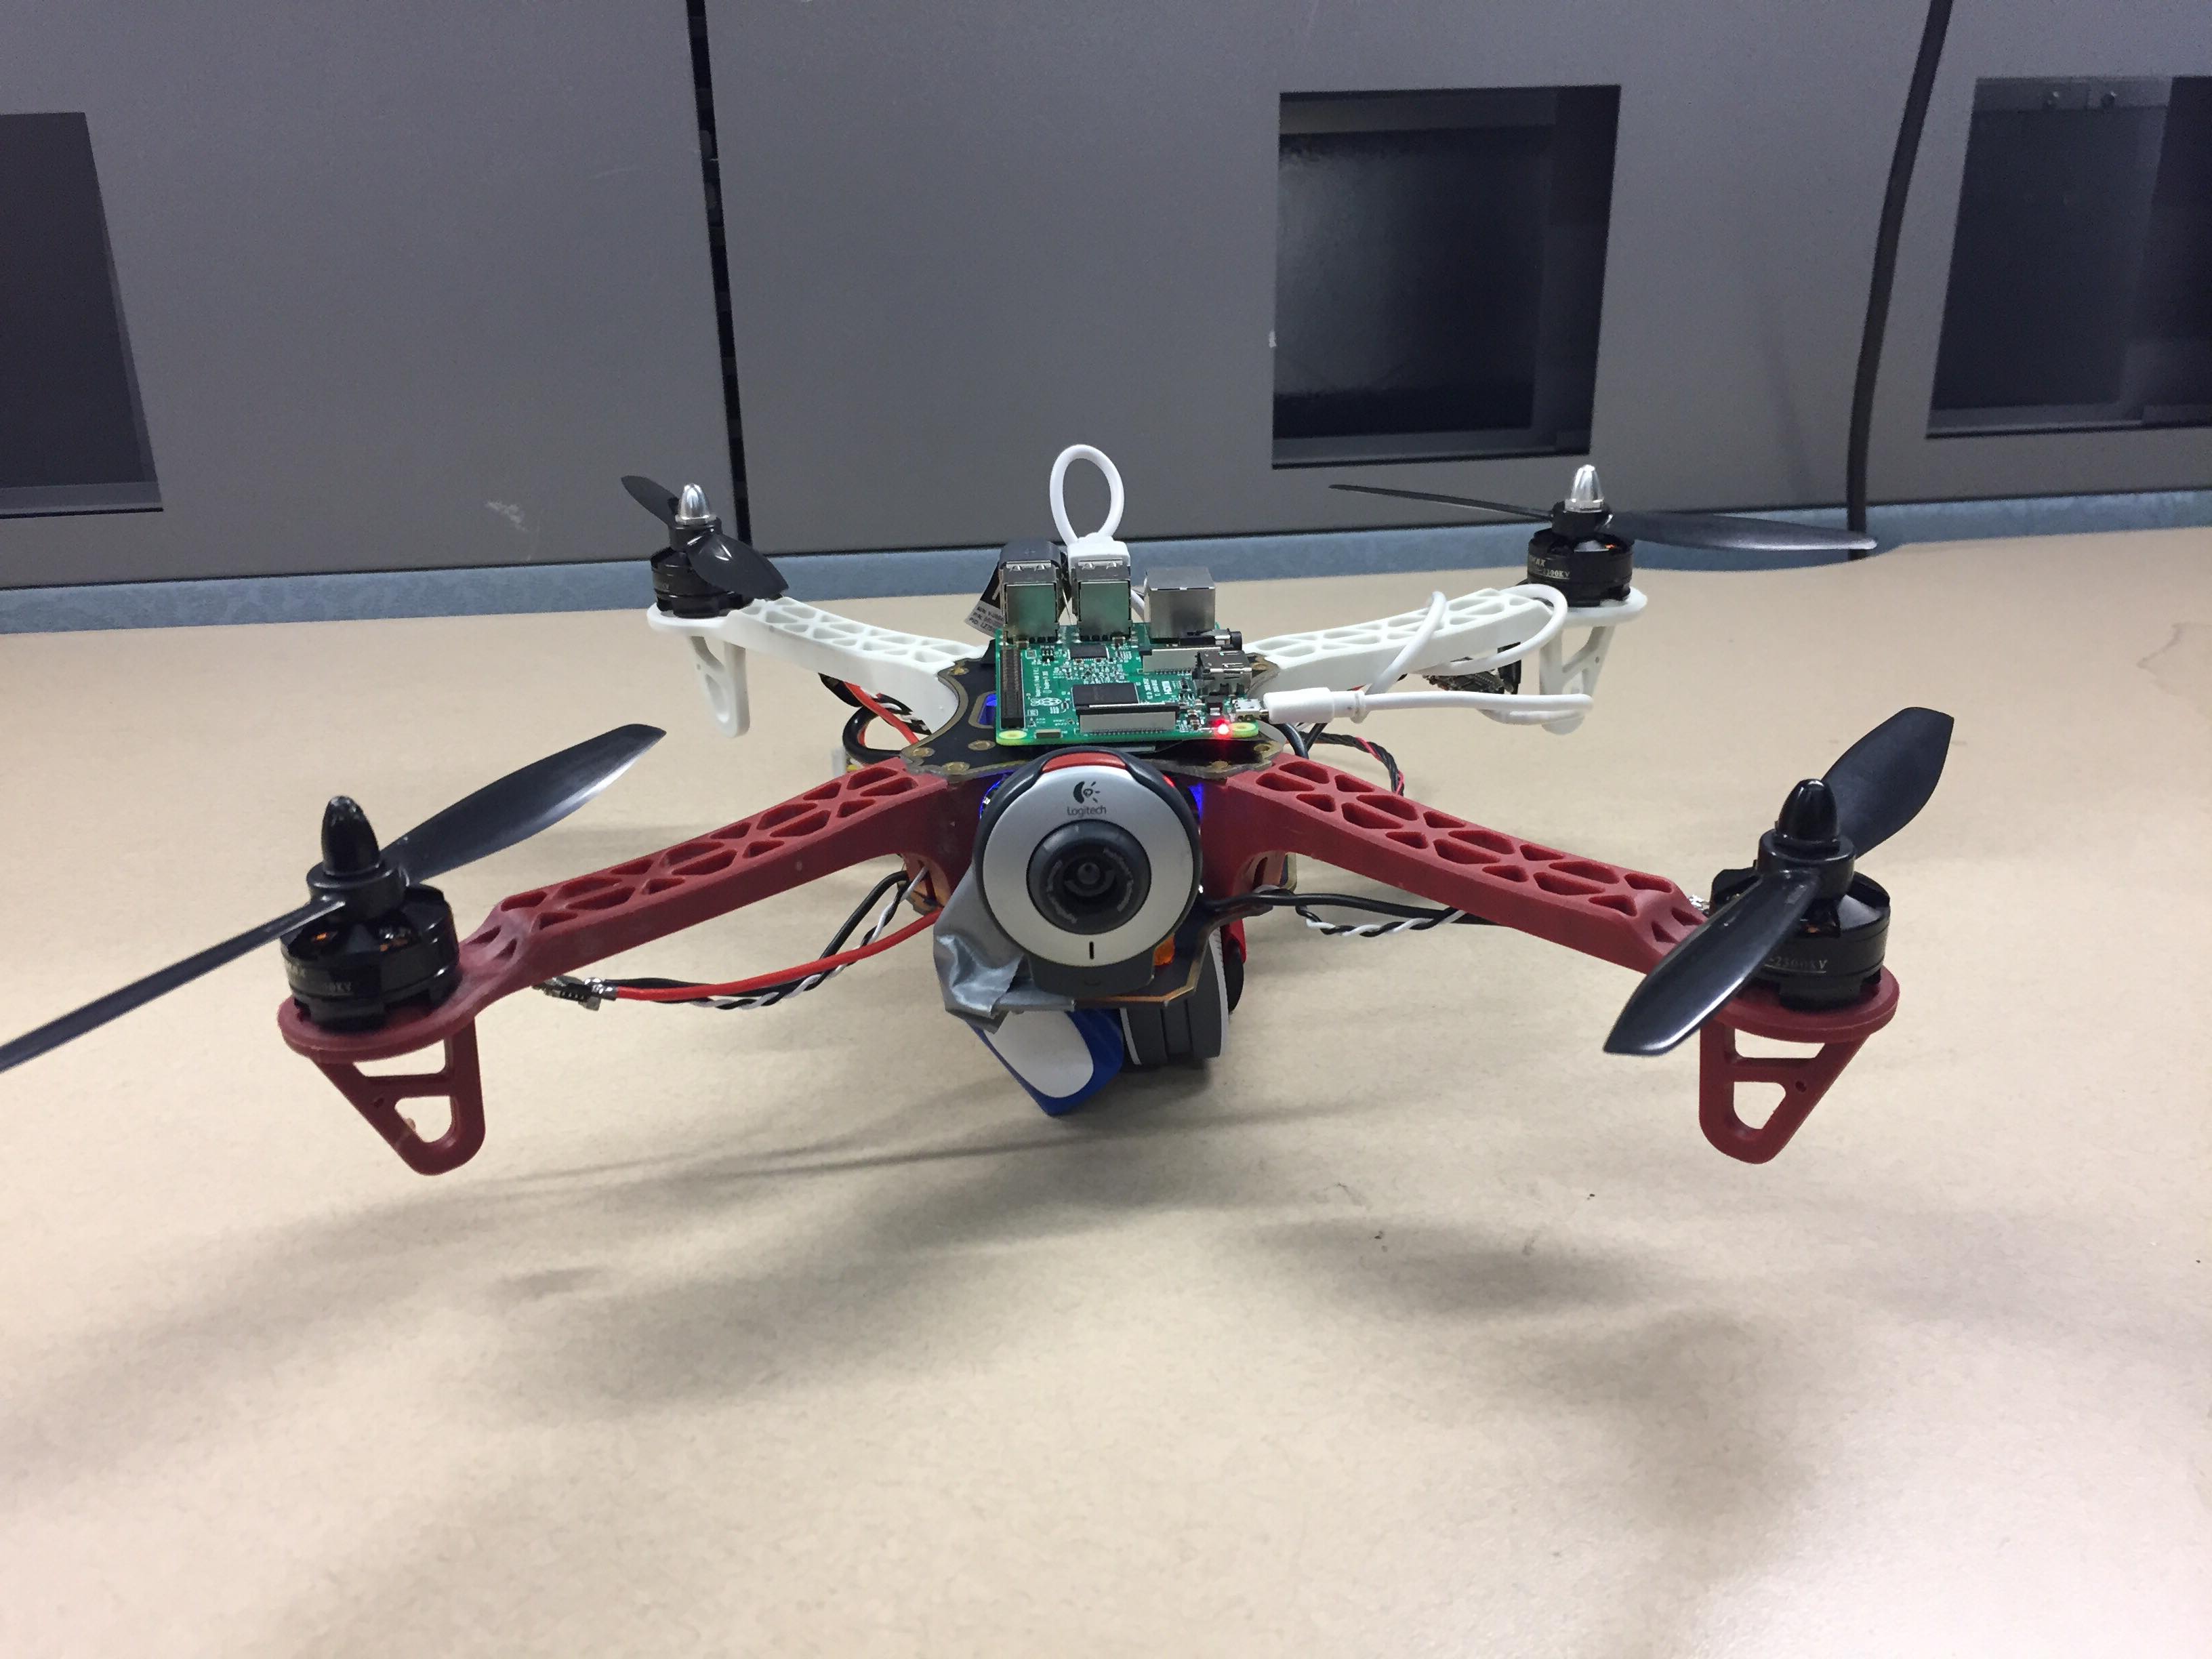
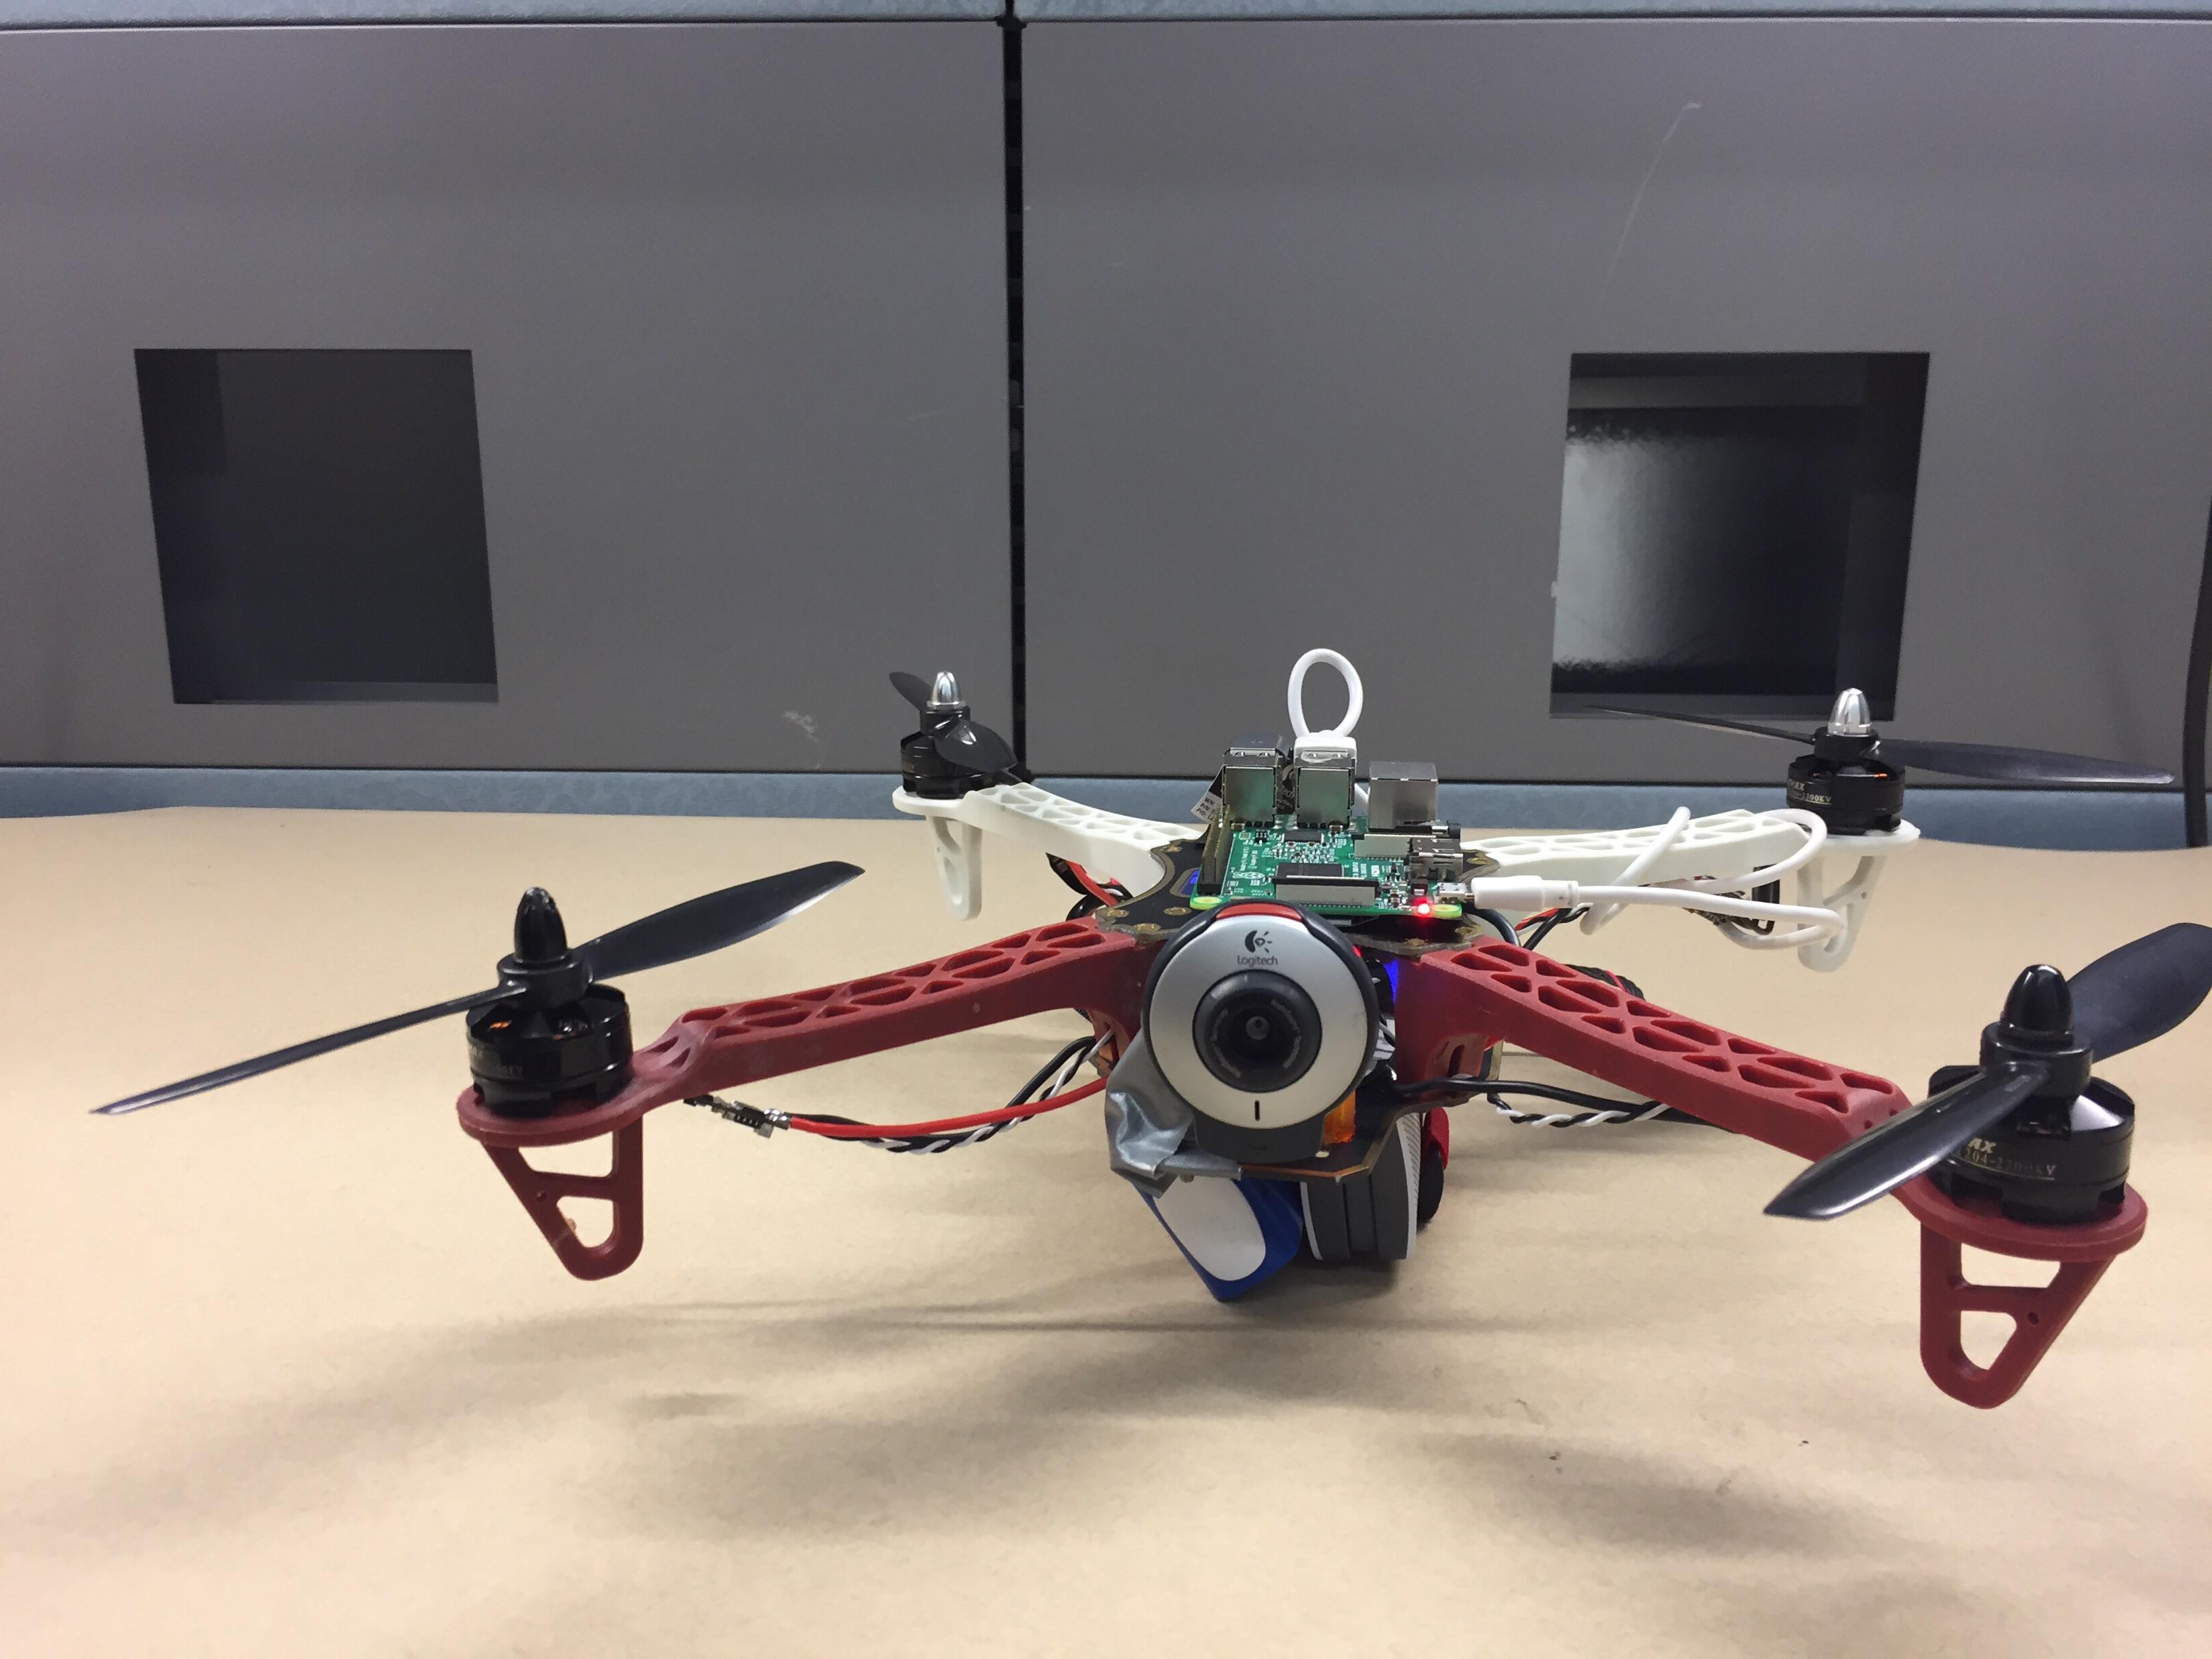
The drone has a Naze 32 F1 flight controller because of its compatibility with the ROSflight firmware. Since we used an F1 controller we had to use a FrSky XRS receiver that had a PPM signal, as specified in the ROSflight documentation. We decided on a Raspberry Pi 3B+ with a 32GB SD card as our onboard computer, with a Logitech webcam for the image processing. Lastly, we used a Taranis QX7 transmitter because it is compatible with our receiver and has an easy-to-use user interface for setting up flight models.
Our quadcopter frame was a generic racing FPV drone frame. It took care of most of the parts, but because we used a webcam instead of an FPV camera, we had to create a custom 3D-print piece to attach the webcam onto the drone. Because it was difficult to design the perfect custom part, we also included a little bit of duct tape to secure the webcam position. The webcam is connected to the Raspberry Pi at a USB port. Finally, we firmly and cleanly fastened the Raspberry Pi to the quadcopter with some double-sided tape and connected it to the F1 controller with a USB-to-microUSB cable.
Software
Our software consists of two main parts: the ROS nodes, and the computer vision algorithm. Everything is written in Python2.7 and runs on the Raspberry Pi, to which we downloaded Ubuntu 16.04 and installed ROS kinetic. We actually discovered that Ubiquity Robotics provides a Ubuntu 16.04 image with ROS kinetic already installed, which made the flashing process a lot easier.
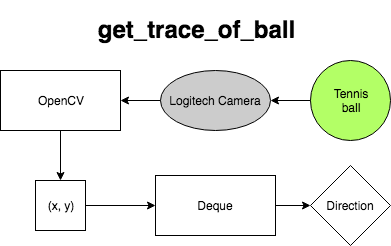
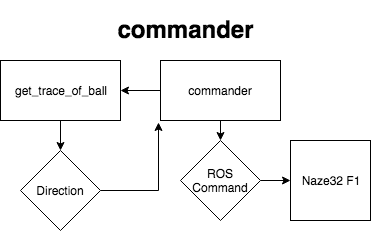
We have one main ROS node that acts as the connection between the computer vision and the quadcopter. Our ROS package, sight_to_flight, has one ROS node: commander. The ROS node calls the get_trace_of_ball function in the trace_ball package and receives 1 of 4 directions: 0 (up), 1 (down), 2 (left), and 3 (right). commander then generates a new Command message, defined in the ROSflight package, sets the parameters to correspond to the appropriate direction, and publishes it to the /command topic. It then restarts the get_trace_of_ball function and loops until the ROS program is quit.
Our computer vision code is all contained within the trace_ball package. The relevant code is contained within get_trace_of_ball_function.py, which uses OpenCV, NumPy, and Deque. The program begins by setting up parameters such as the max time to run, creates a deque, and opens up the webcam feed. It then runs a loop until it either is killed by commander or times out after about 30 seconds. Within the loop, it keeps track of each frame, at a rate of about 30 FPS, and detects a yellow circle (our image of a tennis ball) with OpenCV’s edge and color detection algorithms. The program compares the current center of the ball to the previously calculated center and determines the most probable direction that the ball has been travelling in (basically just the direction with the largest change) before adding that direction to the deque. After the deque is full, the program determines which direction the tennis ball has travelled in the most, and returns that as the output. If no direction is returned, the program returns -1.
System
Our system is simply composed of the three separate modules: the quadcopter and its firmware and flight controller, the Raspberry Pi and ROS, and the computer vision and webcam. As described before, the F1 flight controller is connected to the Raspberry Pi with a USB-to-microUSB cable and controlled by ROSflight, and the computer vision outputs are converted to ROSflight commands through the custom ROS node commander. The system runs as follows:
- The quadcopter is turned on, powering the Raspberry Pi as well.
- With an offboard computer, we connect to the Pi, which is set up for headless
-
We run the ROS node
commanderfrom the offboard computer -
commandercalls the computer vision algorithm,get_trace_of_ball -
get_trace_of_balltakes in feed from the webcam and returns a direction (or no direction) -
If no direction is detected,
commandersleeps for 5 seconds and callsget_trace_of_ballagain -
If a direction is detected,
commandercreates aCommandmessage and publishes it on the/commandtopic - The flight controller receives the command and actuates the quadcopter accordingly
- Steps 4-8 are repeated until we kill the ROS node and ROScore with the offboard computer
Challenges
We experienced difficulties with both the hardware and software while working on the drone. One major issue we ran into was a malfunctioning motor. There are four possible causes: an ESC (electronic speed controller) is burnt out, the pins that the ESC is soldered to on the flight controller are burnt, the soldered connection between the flight controller and the ESC is not making enough contact, or the motor itself is burnt out. At first, we suspected the soldered connection was the reason the motor would not spin, so we tested out this theory by resoldering the connections and adding more solder. When this failed, we resoldered the ESC to different pins on the board, careful to neither desolder one of the other wires nor create a bridge and short the flight controller. However, this failed to solve the issue as well. We decided to swap out the ESC in hopes that it would solve the problem. Unfortunately, we did not have access to a multimeter that had continuity, and thus were unable to test all the MOSFETs on the ESC to see if one was burnt. We replaced the ESC, but discovered yet again that our assumption that the ESC was the cause for our motor malfunction was incorrect. We finally came to the conclusion that the motor itself was burnt out. Even though we solved this problem, we lost valuable time on the project and delayed testing so long that we were never able to fully catch up to our schedule afterwards.
Another issue that we experienced but were unable to resolve was with the transmitter. We had trouble setting up the arming channel correctly on the transmitter and in the ROSflight program, which prevented us from controlling any of the motors on the drone, and by extension, from flying. ROSflight provided extremely sparse documentation; moreover, in the few forums online that discussed these issues in regards to ROSflight and not some other firmware, no solutions were presented. As a result, we were unable to fly the drone and make the motors actuate the commands the flight controller received. This ended up being our bane, as even though we completed everything else, we were unable to actually fly the quadcopter.
Results
Our final result was an almost-working quadcopter that was just unable to fly. Our computer vision and ROS software was able to properly function and send commands to the flight controller. On the hardware side, our drone fully functioned and was controllable with the transmitter when using Betaflight instead of ROSflight. The connection between the Raspberry Pi and flight controller sent the appropriate messages, and the flight controller received them as well. Check out the pictures and videos!
Conclusion
In the end, Acroquad met all of the design requirements except the final flying phase. All of the hardware and software functioned perfectly. Of course, no robotics project is complete without hacks. With the hardware, we attached the webcam to the quadcopter frame with some duct tape--it is, in robotics, a panacea. On the software side, the main hack was with how we called the computer vision code with the ROS node. Because they had been written separately, the computer vision code was originally run as a Python program and not a function. We simply jammed all of the code into a function, get_trace_of_ball, and just called that ugly long function with the ROS node. The final hack was how our offboard computer ran code on the Raspberry Pi. We never got around to creating a script that would start everything necessary for the quadcopter to fly, so instead, we would run the roscore in the background before calling commander. With more time to clean up the hacks, we would definitely design a better 3D-printed mount for the webcam, clean up the code with more articulated functions, and write a shell script that would cleanly take care of running all the software. Furthermore, we can extend our project by improving our computer vision capabilities to be less sensitive to noise and to detect a wider range of movements, including not just a tennis ball, but also human body movements. And it can never hurt to get more powerful hardware, most notably a better (and more expensive) onboard computer.
The one problem that prevented the drone from actually flying was with the ROSflight firmware. ROSflight is set up so that the motors are unable to actuate because of the intense safety features implemented in the firmware. The lack of a properly set arming channel on the transmitter prevented us from being able to actuate the motors via the ROSflight commands or the transmitter. Due to the lack of documentation and resources on how to set up an arming channel for specifically ROSflight, we did not have time to overcome this challenge before our deadline. Basically, everything worked, but ROSflight implemented a safety feature that we could not disarm to get the drone to respond to the commands. In the future we hope to solve this issue and possibly even write documentation for ROSflight on how to overcome this problem.
Miscellaneous
Raspberry Pi: https://www.raspberrypi.org/products/raspberry-pi-3-model-b-plus/
ROSflight: https://rosflight.org/
Ubiquity Robotics Raspberry Pi Image: https://downloads.ubiquityrobotics.com/pi.html